Making Pages Guide And Terms
So, you want to assist me in making pages and banners? Well, the place is the place that will get you started on it.
Terms
Before we begin, there are some things that you should keep in mind. These are basically terms. If you don't follow them, I'll likely reject the page and/or banners.
- IGM has rules. Follow them.
- Typically, I only add games that have been released somewhere.*
- Some unreleased games may have pages if they are relevant enough and/or have playable builds, such as Evermagic, but this is on a case-by-case basis and are only included in author pages for now.
- All game pages must use the same id in the file name (more on it later).
- All author pages must use the author name as the file name. (like fractyl.html or rylie-eric.html)
- All html pages must follow the same format and css of all of the other pages (although you can make a unique css file for your game if I approve of it beforehand and also doesn't completely change the page)
- Banners are optional, but are required for home page featuring. If you do decide to do them, banners have their own terms (more on it later).
- Please avoid swearing, slurs, 1st/2nd person, or breaking other site conventions unless absolutely necessary. Just ask if you have a question about it and I might be able to answer it.
- I might refuse something for a reason not listed here, but I am not a strict person so as long as the page/banners aren't too different from other pages, you should be fine.
- Finally, this is just for fun. I am not going to profit off any of this and you still own the stuff you made for your game.
We're now ready to start making pages and banners!
Making a Game Page!
This guide assumes you are hosting your game on Pastebin. This was written before Pastebin functionality broke, so all images incorrectly not use https://pastebin.com/raw/, though all text has been updated to use https://pastebin.com/raw/ when needed. Images will be updated at a later date.
For this example, we'll be making a page for Pancake Maker by me (AgentRylie).
First, I recommend just taking an existing page and copying and pasting into a new file with the game's id if the page for the game doesn't already exist. A game id is basically just a way to refer to the game in a short and concise way in files.
Game ids by default use the full game title in lowercase, sometimes followed by the author name if there's a game with the title already. Some games before the March 29th, 2025 (Pastebin Issues) update (which set this standard) without pages may already have ids using the older shorten format. See this page for games with ids but no pages. This is a text file for simplicity. As long as an id isn't already in use though, you can use whatever you want. For this example, I'll use the id "pm" for Pancake Maker.
In the text editor of your choice (I'll be using Notepad++), open a new copied file named the game id you picked, and change the game name and author to, well, your own game name and name! Once you do that, it should look like this in the editor. Changes to note are underlined. Don't worry about everything else just yet.
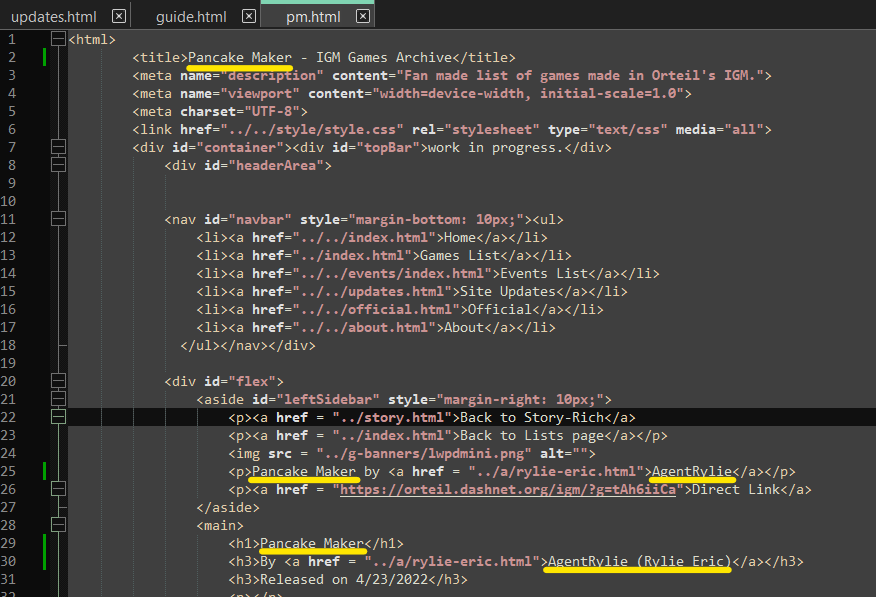
Note: "leftSidebar" is now just "sidebar". Do not use "leftSidebar".
We're going to focus on the left sidebar first. First, we'll change the theme listed to whatever theme our game is (or not, if it is the same from where we copied it, which in this case is not). Usually themes are already decided, but if you think your game fits better elsewhere, you should change it to that instead. Change both the "a href" link as well as the text to match.
Next is the mini banner or the only img line in the sidebar. For visual purposes, I'll change it despite not having made banners for this game yet, but if you want a mini banner, this is where you would put it on your game page.
Next is the Game Name by Author line. The text should already be changed, but now we'll also change the link to our author page (if you have one, that is). You can remove it too if it is not a concern for you right now (remove both the a href and /a).
Finally is the direct link. This should match what is present on the theme page. For my example, it would just be the "https://pastebin.com/raw/rdekpqbD" with the note of Regular, but you would need to include multiple links if there is multiple (just copy and paste the line and change the link).
The sidebar code should look like this when you're done.

Next will be all of the headers and links. Like in the sidebar, you will need to change or remove the author link page and change the first link to direct link (and also add any other link featured there).
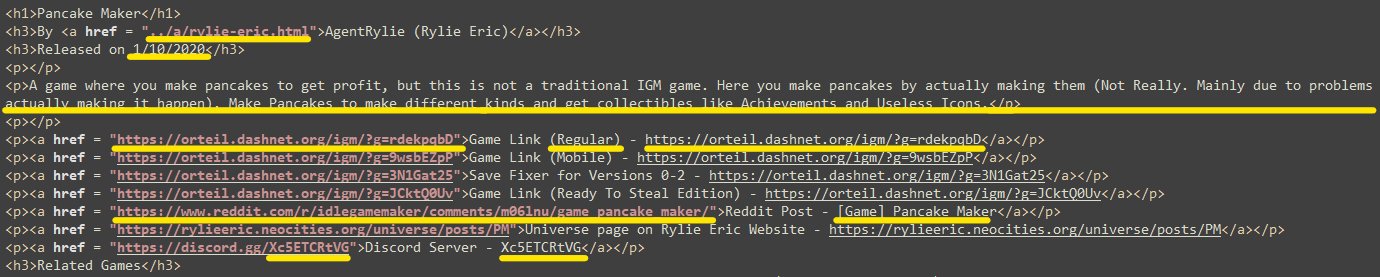
The release date is next. This is the date it was first RELEASED PUBLICALLY, whether it be on DashNet, r/idlegamemaker, or your own website (if you have one), in the MM/DD/YYYY format. In Pancake Maker's case, it will be 1/10/2020.
Next is the short description of your game. I usually pull these from game posts or game descriptions. Pancake Maker's is a bit longer, but the intention here is to describe the game quickly and nicely.
The links are the last part of this section. Links follow the same structure minus Reddit and Discord links, which use post title and invite code respectively in place of the full url in text. Links follow this order.
- Game link (Direct Link or the Main version) (for Pancake Maker, it will be the same link we've been using)
- Variations on the 1st link if any (Pancake Maker does not have any, but usually this would be redirect links and such like linkh.at links)
- Other notable game links or versions (Pancake Maker also has https://pastebin.com/raw/9wsbEZpP (Mobile), https://pastebin.com/raw/3N1Gat25 (Save Fixer), and https://pastebin.com/raw/JCktQ0Uv (Ready To Steal Edition)) + variations if any
- Reddit Post (if there is one)
- Personal Website Page (if there is one)
- Discord Server (if there is one)
Pancake Maker has all of them minus the link variations, so for this example, I will be having 7 links. This is what the final code would look like.
Next is Related Games. This is not something a majority of games will use, such as our example here, but this where other games that have some relation to the current game go. The games here could be part of a series or just built upon from a template game. A Ice Cream Clicker uses this. If you don't need it, delete it.
Finally is the Game Details section, which could be the hardest section in a page. The games details explain the game more in depth in the first paragraph, usually pointing out where the game has been released at as well (although you can drop it throughout if it reads more naturally that way). The following paragraphs are used to go over the history of the game, if there is any. To keep our example simple, I will just do the history of Pancake Maker up until its release alongside an in depth description. When you're reading this, the page may have its full history.
Game History made be short or long depending on the game. For longer game histories, sometimes the Details and History are split into two different sections. A majority of games though will not exceed 1 or 2 paragraphs
Something to note is html tags. There are several, but the ones you'll likely want to use is p (paragraph), bold, italics, strike, and a. I can't type those tags here, but all five are included in the pm example source page for viewing purposes.
Another thing to note is that it could be written however you want as long as it follows the terms and the details + history format. Below are other examples of Game Details (more may be added later).
- A Ice Cream Clicker is written in the 1st person. (this was before proper terms have been laid out)
- Cake Clicker is a standard example of how most pages are written. This was also the 1st completed page of a game by someone other than Rylie.
- Get a Glass of Milk Because You Have To is written as if the Narrator wrote it.
The last thing in all pages is either the banner, "Banner ineligible. (Reason)", or "Banner TBD." If you made a banner, you put that there in the same way you put your mini banner at the side bar. Since banners on game pages are simply decorative, you don't need to use alt text (keep it alt="" or alt="banner for the game"). If you didn't make a banner, put "Banner TBD." If your game is ineligible, use the "Banner ineligible. (Reason)" with Reason replaced with the reason.
And that's it! Our finished page should now be completed and ready for a pull request! The source code of pm.html can be accessed here and the page itself can be accessed here.
Making Banners!
We're nowing making it look cool! Usually, I'll make the banners myself, but after some requests back when the site launched, you can too! These follow the same terms as before, but now have some additional ones as well.
- Game needs to be available (so no deleted games)
- Game needs to have images or some unique item positioning
- Banners need to be png, jpg, svg, webp, or gif (gifs are only for mini banners and are only accepted in some circumstances)
- Banners must follow the template, at least in a way that makes all of them uniform.
Here are the banner templates that you will need. They are in both pdn (for Paint.Net) and png formats. You can use both banners, but at least one of them is required in order for the game to be in the home page and such. If you want the font too, you can get the Roboto Slab font at Google Fonts if it is not on your device already.
For this example, I'll be using Paint.Net, but any photo editing software that supports layers are recommended (layers will make the process easier).
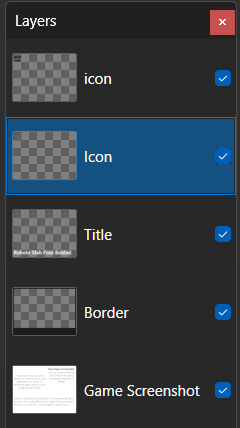
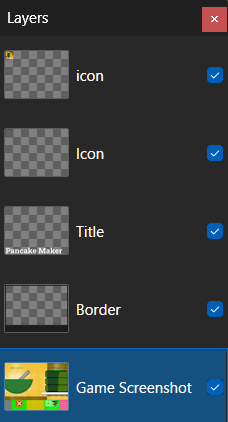
We're going to start with the main banner. You are going to want to open the image on the program of choice (Paint.Net in our case). If you are using the png, seperate it into 4 (or more) layers for the icon, border, title, and game screenshot. This is what the pdn layers looks like.
We are going to start with the 48 by 48 icon. This an optional element inspired by my own personal site. You can put anything you want here assuming it fits. I'll be using my site icon for Pancake Maker, which fits. Perhaps I may consider larger or smaller sizes at some point.
Next is the title. The template explains this really well, so I'll just leave it to it.
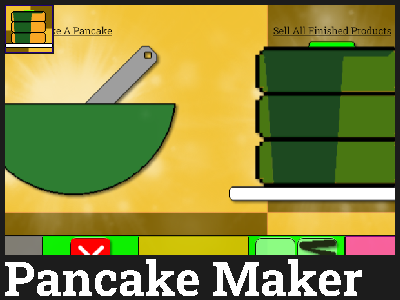
Finally is the game screenshot. This might be tricky as it needs to fit the small size (unless you are making it an svg, but that's outside the scope of this guide). Use what the template tells you and try your best to get something that shows the game well. For Pancake Maker, I decided to focus on the two big buttons, as well as some of the ui.
When you are done, I recommend saving this as a seperate file (unless you don't want to make more borders any time soon) named after the id (in this case, pm.png).
Our result should look like this. Layers are shown next to it.
We'll do mini banners next. The process is mainly the same, but there are some differences.
Once again, seperate it into 3 layers if you are using the png version. The pdn has 3, being border, icon, and background. Mini banners only need to follow the size (and terms), so do whatever you feel fits the vibes of your game! For my own mini banners, I usually put an icon at the right, and have the background and border fill the rest. The border color in the mini template actually uses the standard shade of purple that I use for my own site icons (#21007F). You can also put the game logo too if it fits.
Here is the Pancake Maker mini banner.

Making an Author Page!
Author pages are similar to game pages in what to replace when changing details in a copied file. The sidebar here is used for a single image to represent the author (optional) and game mini banners associated with them. This only changes when you reach the main content.
The first three lines are Name, Other Names (Also Known As), and a title. Name should be the name you are using right now in full. Other Names are only needed if you ever gone by a different name when you released a game and can be removed if there is none. Titles are just for fun. Mine is "The Person Who Runs This Place" because I happen to run this place.
The next line of importance is where the author (you!) will be dicussed. I have not written mine yet, so I will talk about myself. Mainly it should focus on history with IGM and some details about them. I guess "writer" and "game developer" fit me well.
This is what the code should look like when it's done. Important areas of note are underlined once more.

Next is the IGM Games section. This just lists every game they made and released in alphabetical order, regardless if they currently have a page or not. Additionally, if the author has contributed to a game as a Secondary developer, it would be included in the Contributed To section afterwards. I have not done any contributions, so I just have a IGM Games section.
The final section in an author page is Other Notable Games. This is usually reserved for games outside of IGM that have a notable connection to the IGM side of the developer. This is mainly just to let people know that there is additional stuff to a person's IGM games. This section's intended use is best shown in my own page, which features links to Listen to the Phone Ring and Neapolitan, both of which are related to my IGM games in lore.
And we're now also done with the author page! The source code of rylie-eric.html can be accessed here and the page itself can be accessed here.
Submitting the Files!
This is the final step in the process! To actually give me the files so I can put them on this website.
To submit files, do a pull request in this repository. On the page head to pull requests and create a new one. You might be asked to fork it, in which case you do. In the fork, add the files in the corresponding folders and go back to igmgames repository to create one with the fork.
Alternatively, if you don't have a GitHub account, you can send the files over through File Garden, Pastebin, or Discord, though do note that the banners may be compressed if sent through Discord.
You are now done with this guide! I hope this has helped you understand what I am looking for, as it is the reason why I made this in the first place.